iPhone / iPad setup steps
Shadowrocket Setup Guide
Import your existing details first, then choose a routing mode. After connecting, check both the test result and actual access. The steps below follow the order of an initial setup; interface labels remain in their original English.
Complete each step before moving on. The screenshots are interface images provided on the App Store product page; the app's current layout may differ.
Existing details → list entry
Add a server or import a subscription
Open Shadowrocket and stay on Home. Scroll down to the SERVER section and check whether the list already contains the entry you plan to use. Initial setup usually requires adding your details first. If you have the address, port, and authentication details for a single server, choose Add Server. If you already have your own subscription link, import it using the in-app Subscribe option. Choose either method; you do not need to use both for this guide.
Enter details manually with Add Server
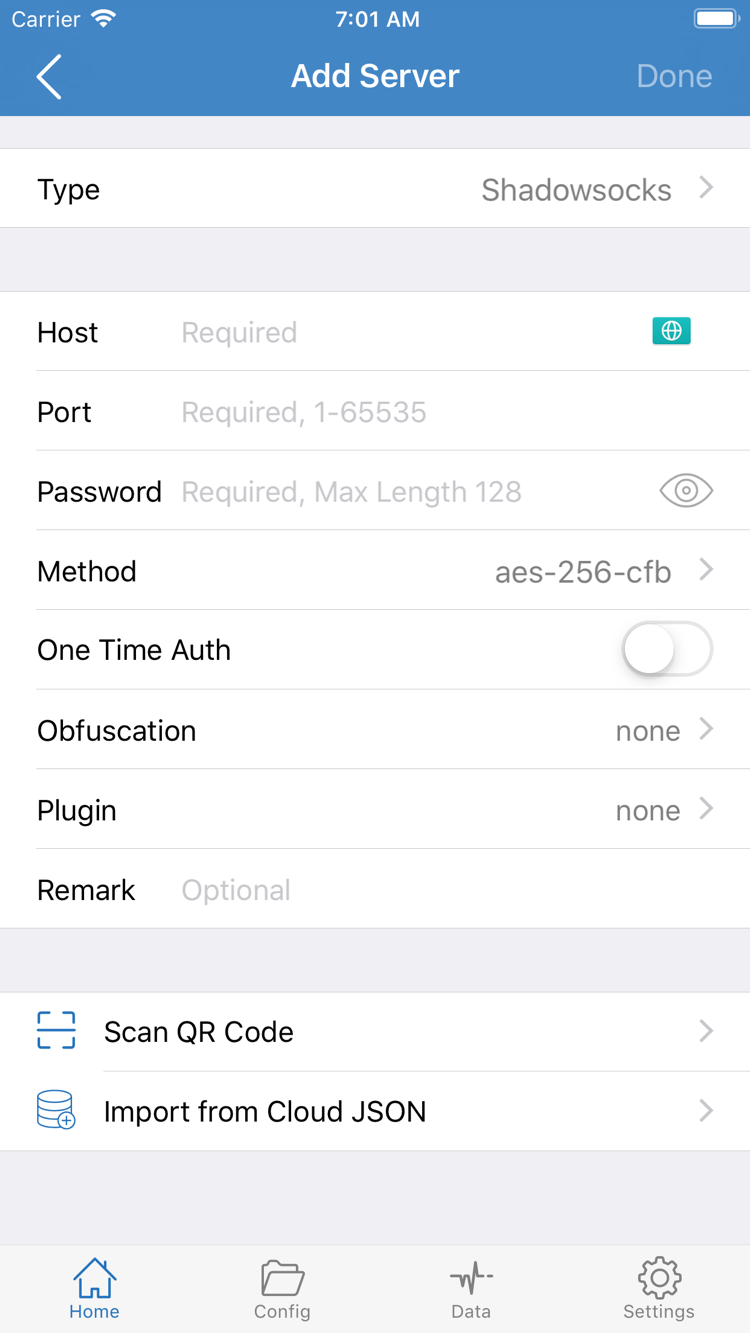
In Add Server, first choose the Type that matches your existing details, then fill in fields such as Host and Port. Depending on the selected Type, the interface may show Password, Method, or other fields. Enter each value from your existing server details; do not guess based on field names from another protocol. Check the characters, port, and protocol type before saving and returning to Home. If your details are provided as a QR code, you can use Scan QR Code on the page; after scanning, check that the recognized content matches the original details.
Import from Cloud JSON is another import option in the interface. It is not the same as pasting a regular subscription link into the manual server fields. If you are unsure about a file format, first identify whether you have server parameters, a subscription link, or a configuration file, then choose the corresponding option. Do not mix formats just because an option says Import; an entry may not display correctly if the format does not match.
Import an existing subscription with Subscribe
If you already have your own subscription link, choose Subscribe in the add menu, enter the full link in the appropriate field, and save. Return to Home and check whether a subscription group and selectable entries appear in the list. When copying the link, do not include trailing punctuation or extra spaces. The link's validity and contents are determined by its provider. This site only explains how to import in the app; it does not provide, sell, or recommend servers or subscriptions.
An entry appearing in the list does not mean it is selected. On Home, tap the server you plan to use, then continue to set Global Routing. If the list is still empty after saving, check the import type, make sure the link is complete, and confirm that the current network can reach it. Do not turn on the connection switch yet; you need a usable entry first.
List entry → routing mode
Choose Global Routing
After confirming and selecting an entry, return to Home and open Global Routing. This setting determines how traffic is handled; it is separate from choosing a server. First decide what you need: choose configuration (Config) to route traffic according to rules, proxy (Proxy) to use the currently selected server, or direct (Direct) to connect without a proxy for now. After changing modes, return to Home and check the selected option.
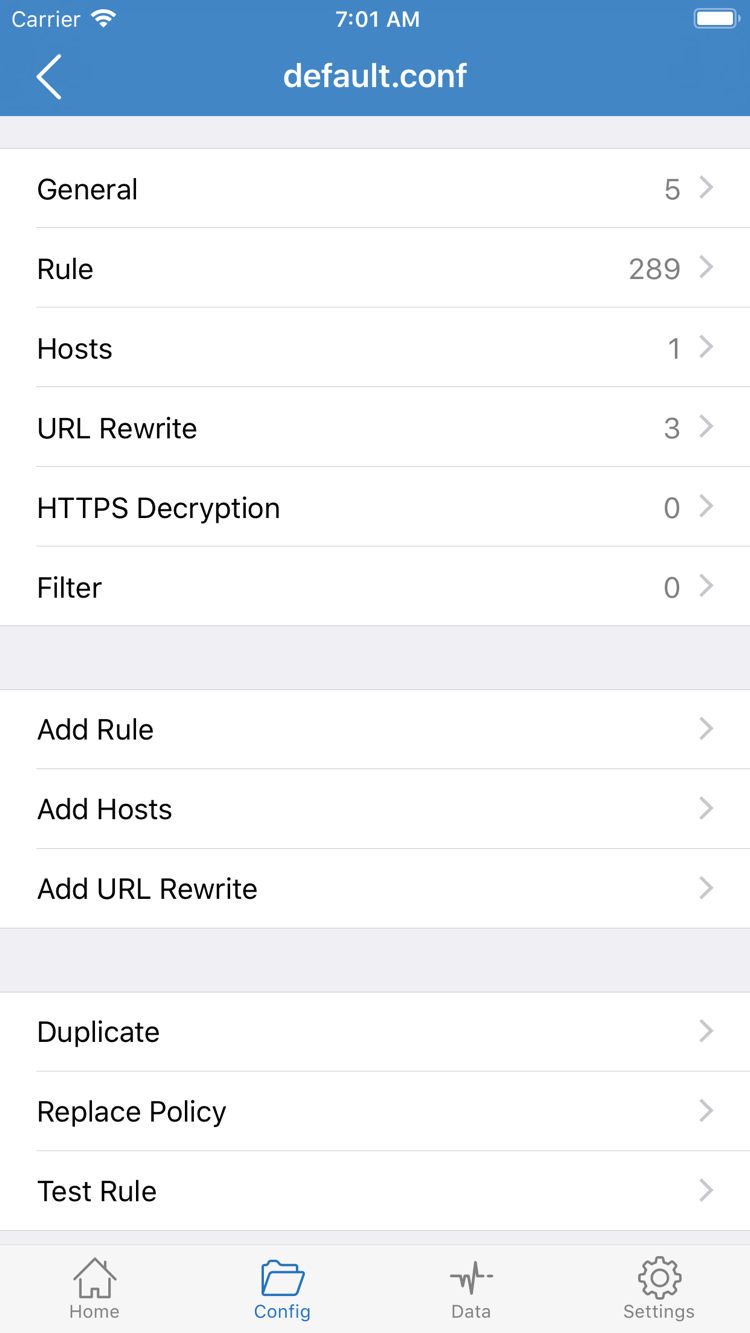
Config relies on the rules in the selected configuration file. Rules are generally checked from top to bottom, and the first matching rule determines how traffic is handled. Any traffic that does not match is handled by FINAL. So with Config, a connected switch does not mean every request follows the same route; the result depends on the rules and policies. You can view the current configuration file in Config and check sections such as General and Rule. If you use Add Rule to add your own rules, first check what they match, which policy they use, and where they sit relative to existing rules.
Proxy is useful for ruling out issues caused by rule selection: if content works with Proxy but only some content fails with Config, focus on the configuration file rather than repeatedly changing server fields. Direct provides a point of comparison: it means the current test is not routed through the selected server, so successful access with Direct does not prove that the server works. Keep the purpose of each mode in mind; Direct is not a backup server to use when a connection fails.
The screenshot shows the Config configuration editor, not the Global Routing selection page. It helps you locate the rules; it does not mean you need to edit the configuration. For your first setup, use the mode required by your existing configuration and leave the current settings unchanged if you are unsure what the rules mean. See Concepts at a glance for explanations of keywords such as DOMAIN-SUFFIX, GEOIP, PROXY, and DIRECT. For a step-by-step rule troubleshooting guide, see the Troubleshooting Manual. Once you have confirmed the mode, turn on the connection in the next step.
Routing mode → system connection
Turn on the connection switch on Home
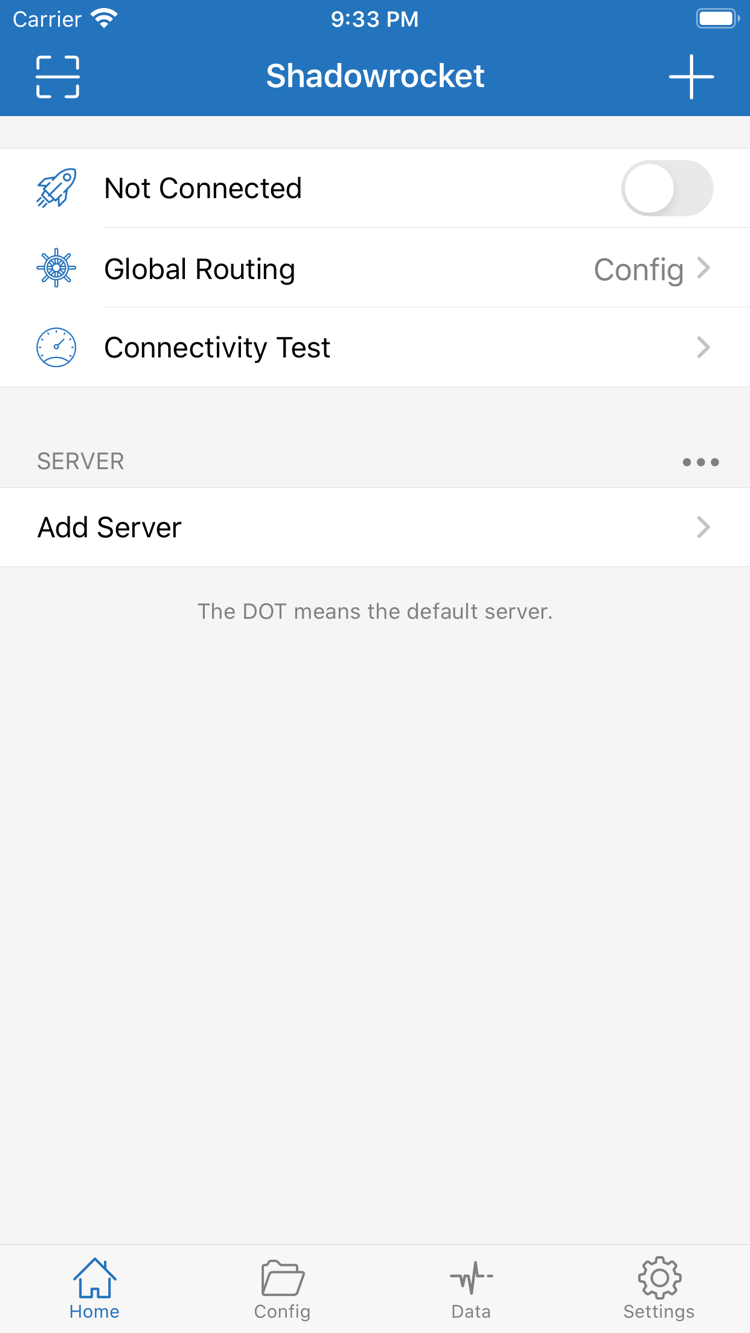
Return to Home and check these items from bottom to top: Is the entry you just verified selected under SERVER? Does Global Routing show the mode you intend to use? Does the connection status at the top still read Not Connected? Turn on the switch at the top only after checking all three. This helps you identify whether a failed connection is due to an unselected entry, an unexpected routing mode, or the connection itself.
The first time you turn on the switch, your iPhone or iPad may show a system prompt asking to add a VPN configuration. Follow the on-screen instructions to authorize it and, if required, complete device authentication. Then return to Shadowrocket and check the status. This prompt is a system step for setting up the connection, not a place to enter a subscription link; do not enter your server password in the system authorization dialog. If you dismissed the prompt, start the connection again in the app and follow the system prompts that appear.
After the switch status changes, wait for the interface to settle before continuing; there is no need to toggle it repeatedly. If the top still shows Not Connected, check that a server is selected, the network is available, and system authorization is complete. If you changed Global Routing without checking which entry is selected, return to Home and confirm the selection first. Connection status only shows whether a connection has been established; it does not replace an actual access test.
The iPad window layout may differ from the iPhone layout, but the steps remain the same: select an entry, check Global Routing, connect, and verify. Do not rely on screenshot positions to find buttons; identify the relevant areas by the Home, SERVER, and connection status labels shown on your screen. Check the App Store listing for system compatibility requirements. After connecting, continue with Connectivity Test and check the content you actually need to access.
Connected → check the results
Verify with Connectivity Test
Once the connection status is stable, find Connectivity Test on Home and run the test. It can help check connectivity under the current conditions, but a single test does not guarantee that every app or domain will work. Note whether the test completes, fails, or keeps running without returning a result. Then open the content you need to access and check whether it loads as expected. The test result and actual use together help determine what to check next.
If the test completes and the content you need also works, initial setup is done. Do not keep switching to unknown configurations just to get a different test result; note the current server selection and Global Routing mode so you have a baseline if an issue comes up later. If the test succeeds but only some content fails, check the Config rules first: the domain may match an earlier rule or fall through to the policy specified by FINAL. Switching to Proxy for comparison can help determine whether the issue is related to rule matching.
If Connectivity Test does not complete, first confirm that the device can access ordinary content on the current network. Then recheck the server fields or subscription entry rather than adding rules right away. If both the test and actual access fail, check the connection status, selected entry, server details, and current network in that order. If the issue occurs only on a particular Wi-Fi network, repeat the same test on another available network and compare the results. Changing networks helps isolate variables; it does not mean you need to change server details.
Change only one condition at a time. For example, keep the server unchanged and switch only between Config and Proxy; note the result, restore the original mode, and then check other settings. This makes it easier to identify which change affected the outcome. For more on testing methods, rule matching, and DNS, see Concepts at a glance. For a complete troubleshooting process covering multiple symptoms, see the Troubleshooting Manual.
Work backward from the symptom
Check common failure points one by one
Start troubleshooting from the most recent step that worked. Do not refill server details, change Global Routing, and edit system settings all at once. If the switch will not turn on or disconnects shortly afterward, return to Home and confirm an entry is selected, then check whether system authorization for the first connection is complete. Next, check that the current Wi-Fi or cellular network provides basic connectivity. Once authorization and network access are confirmed, try again and watch the status. If no system prompt appears, do not infer the authorization result from a screenshot; check what is actually shown on your device.
If a saved subscription has no selectable entries, return to the import step and check that you used Subscribe, the link is complete, and the network can reach it during an update. Being able to paste a link does not guarantee its contents can be parsed; an expired link, changed content, or incompatible format may prevent the list from displaying as expected. If a manually added server using Add Server appears but will not connect, compare Type, Host, Port, and the relevant authentication fields with your existing details. Avoid repeatedly swapping fields based on guesses.
If the connection appears established but Connectivity Test fails, confirm that the selected entry is the one you just checked, then test again on the same network. If Proxy and Config behave differently, return to Config and check the rule order, the matching rule for the destination domain, and FINAL. If both modes have issues, check the entry and network first; do not simply append another FINAL rule. Rules are matched from top to bottom, and adding a broad condition at random may prevent more specific rules below it from taking effect.
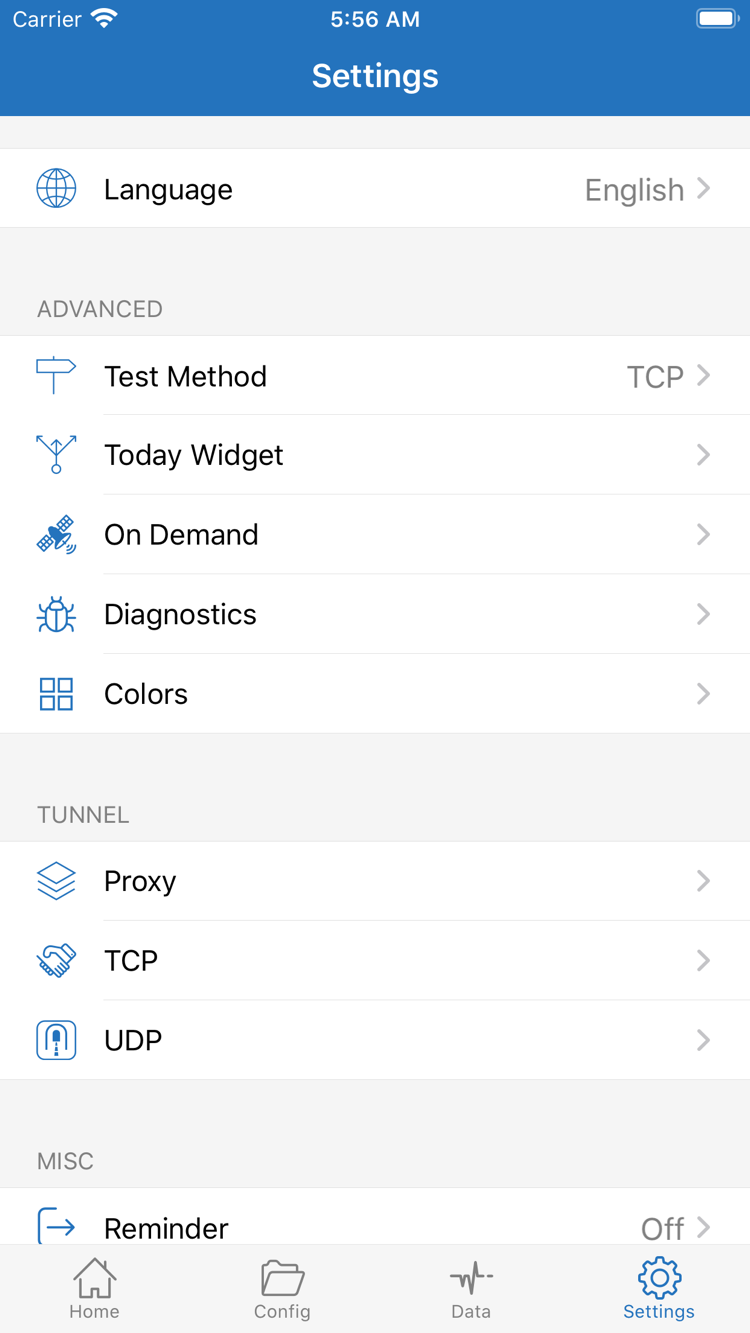
If the issue occurs only on a particular network or with particular content, look for options such as Test Method, On Demand, and Diagnostics in Settings, but do not change every setting you see. On Demand may affect when a connection is established. Note the current conditions, then compare using the same server on another available network. Changing the test method may also change how results are presented; it does not directly indicate a change in server quality. If DNS or other network settings seem relevant, keep the original values and record each change and its result.
If these checks do not identify the issue, note the specific symptoms: the connection status on Home, the selected Global Routing mode, whether a server entry is available, the Connectivity Test result, and whether the issue occurs only on a particular network. Use these details to find the relevant section in the Troubleshooting Manual. To check the meaning of an interface label, see FAQ or Concepts at a glance. After troubleshooting, undo any temporary changes you no longer need, then check the connection and verify the results again.
Post-setup checklist
Keep a record of the server entry you ultimately chose, the Global Routing mode, and the test results. If your subscription content or network environment changes, review the steps in this order: entry → mode → connection → verification. For a more detailed symptom-by-symptom process, continue to the Troubleshooting Manual.
Haven't verified the App Store listing yet?
Check the developer, official icon, and app ID on the product page, then follow the App Store prompts to get the app.